Tuesday, December 21, 2010

Get Well Card

Want to share with you a card I created for a friend of mine who has just had surgery. She loves black and white and the yellow is my take for a challenge posted by  ttp://theplaydatecafe.blogspot.com/            I love black and white with a splash of color. These challenges are some of my favorites.  The background is a black and white paper and I stamped a large medallion on it in yellow.  However, as you can see, it does not show up well....but I kind of like it.  The butterflies are a punch from Martha Stewart. I put TH Rock Candy Stickles all over the butterflies...it does not show up here, but I LOVE the crystal sugar look. Rock Candy dries differently than the normal Stickles... besides a glaze, it dries with little crystals visible in the glaze...looks like it's coated with crystalized sugar.

Have a blessed Christmas season,
ttfn,
e                  

Monday, December 20, 2010

It's the week of Christmas!!!

Here is a card I made with my favorite reindeer image.
The stamp is from Stampin' Up! and I know we have all seen it a lot.
But I love it!!! This one is stamped in Versamark and then embossed in silver.
It shows up beautifully on the navy cardstock.
The background is dry embossed in blues and 2nd generation stamped with trees to give it a woodsy look.
The white flourishes are Sizzix cut with a Cuttlebug.

I am entering the card into
        http://simonsaysstampschallenge.blogspot.com/
Simon Says is blessing the winner with a $50 shopping spree....WOO-HOO!!!
Would love to win...as I am sure all of us would!!!

Good luck, everybody!!!
ttfn,
e

Monday, November 29, 2010

Happy Monday after Thanksgiving...

Good morning on this beautiful Monday morning. I don't work on Mondays so it always makes me appreciate the day.  We had a wonderful week, beginning with the weekend before. We spent that in Chicago...celebrating early Christmas with our kids and grandkids. What a BLESSED weekend!!! Everyone was able to be there...that is a HUGE BLESSING by itself...and beyond that, it all went so well!!!!

Our daughter and her hubby hosted it all, with the turkey and all the trimmings. We opened Christmas gifts and had pictures taken....it doesn't get any better than that!

We love it because so far the weather has cooperated beautifully.
The kids love it because it starts their Christmas early and excites everyone for the holidays coming up.
Works great for our family.

On to a couple of cards:
We did these two for our last card workshop that I have in my home 2x per month.
The pics do not dothem justice...it's hard to get the gold as rich and beautiful as it looks in real life.

The background white layer is stamped flourishes in VersaMark and then embossed with Stampin'Up gold.
Then on the edges we applied gold leaf glue and applied gold leaf pieces. I don't know what that's called, but you buy it in a plastic baggie and it is little scraps of different colors of gold leaf. It is awesome stuff but a MESS to work with. It flies around and gets stuck on everything. The girls enjoyed it ough and said it was FUN! So I'll go with that.

The next white is a Cuttlebug dotted swiss on white cardstock. On the red card the white is backed by red cardstock, on the first card it is gold leaf edged again.

The last piece is a new angel stamp I bought...LOVE this angel...it is truly beautiful. As you can see, one card is stamped on white, the other on red. They are both beautiful!

These were not quick and easy cards....but very nice for special people in your life.

Thanks for visiting.
Have a wonderful week.
And remember that JESUS is the reason for the season!!!

ttfn
e

Monday, October 18, 2010

Look at my new Watermark!!!

Hey everybody, Monday morning, beautiful outside, a day off work....doesn't get much better than that!!! I've got a long list of stuff to do, but that's fun too...wouldn't want to be bored or without a hundred projects that need attention!!! THAT'S LIFE!!! God wants us to be productive, and the most important question we have to answer EVERY DAY is "am I being loving to the people around me as I go about getting my work done?"

My biggest problem as I answer the question above is that I am constantly late in getting my cards to the people I want to bless. I get side-tracked, forget the card or the envelope, am late in getting cards done, etc. etc. etc. My focus right now is to break this and get my cards out on time.


That's why I've been making four at a time...to get some extras in my stash. Here's the next two I have from the inchies set:

Don't they look totally different? I LOVE IT!!!  I started the Pooh one with the inchies and the trees... then got really stuck as to what to do with the rest. There was a challenge that I saw (My favorite things) that asked for a fave character and I knew then exactly what I wanted. I know I'm old now, but I have loved Pooh from when it first came out and my kids were really into it. His little sayings and the deep, heartfelt friendship between them all still touches my heart.

You know what that really cute background for the trees is??? a giftcard holder that I saved because I KNEW I could use it sometime down the road. Pooh is a copy out of a kids' book.  The leaves are stamped and cut out of an advertisement for a stamp store. I really LOVE using advertisements, magazines, whatever catches my eye, because when you cut designs out of them, they are so unique and interesting.

The second card is my favorite I think. I used distressed inks to color paper to different shades of orange, red and pink. Then I stamped on the pieces with little stamps. Here again, I cut some clear stamps apart to get words or images for what I need right then. I store the pieces together so that the original image is not lost.  The black flourishes on each side are actually the ends of a tag I bought at Hobby Lobby from Sizzix. It is made for Hobby Lobby, so you probably have to purchase it there.

Here's the challenges for these cards:
http://crazy4challenges.blogspot.com/2010/10/crazy4challenges-c4c59.html

Well, that's it for me for today. On to paint my bedroom wall.
ttfn
e

Monday, October 11, 2010

Fun with Inchies

Hello everybody out there in blogland....I wish I could meet you all and talk a minute. WOW!!! All the stories we could share...all the hugs...all the inspiration....
but for now, this is how we get to touch each other's lives and I, for one, am happy that we have this.
I like looking at all your sites and reading the short snippets of life as you see it.  It makes me feel blessed. AND I'd be lost without the inspiration to take me on to the next card...the next LO and the next level.

Thank you from me to YOU!!!
BE BLESSED today, this week, and on.

Now, on to my next four cards.
I used inchies this time because I saw a card that I absolutely loved and I knew that inchies are very easy to work with. I also learned something I needed to know. I can't do four cards at a time!!!
Isn't that crazy?  I decided on three card layouts just fine and then I got totally stuck on the fourth one! It's like I just couldn't get anywhere!!! My ideas were good but I just couldn't finish it up...It took forever to get past it. I FELT OVERWHELMED!!!  My whole reason for doing this was to get cards stashed away so that I would have a card when I needed it....simple right?
I guess it will have to be by a little slower process.

On to the first two cards:
Very simple...I know. But fitting for sympathy or other solemn occasions. I cut the inchies from a card my hubby gave me for my Birthday several years ago. I love saving cards and other odds and ends that are beautiful. Cut them up into inchies and they get a whole new life.

On this card, the front is cut shorter and the inside tag cut shows just a little bit.
The tag is a Cricut cut from the Storybook cartridge. I love that cartridge, I use it more than any other.
First I cut a white one in Shadow and then a navy frame. And this is big enough to write a greeting in.

The inchies are rounded on two corners and look really different, don't they? Gives it a totally different look. Again, they are cut from a piece of cardstock that I had played around with several months ago.  Couldn't seem to find any use for the colored cardstock but I loved the colors and it was perfect for this card.

So that's two...
I am entering them into these challenges:
http://theplaydatecafe.blogspot.com/
http://ebtkschallenge.blogspot.com/
http://charismacardz.blogspot.com/2010/10/challenge-40-autumn-colours.html

Saturday, September 25, 2010

Ribbon Flowers

Hello everyone,
Been a while since I have had a chance to get to my blogging (or cardmaking for that matter).... Lots of family stuff and work related priorities. I am so behind in getting cards out to people who have had Birthdays that I feel totally embarrassed.
I had to call my friend today and beg her forgiveness for not getting her card out in time. Her Birthday was on the 14th of September!!!!  But, my cards are almost done and I will be mailing out Monday, so then I can get back on track.

I really like to send personal cards to my family and friends and never have enough extras so I can just grab something that has already been made. I was very happy making each card individual and not a repeat, but it is just too hard. I have now decided to make four cards every time I make a card...it saves tons of time and it will give me some extras in my stash. I will still put different embellishments on each card and make each a little different from the other, but the basic card will be the same.

So here's the first card.....
The two flowers are made of a beautiful white ribbon that I colored with Tim Holtz' Distressed Ink Pad called "Spiced Marmalade". It colored so beautifully, I was totally impressed. I am really loving orange this year and this turned out just beautiful! I LOVE it!

I just made a running stitch on the bottom of the ribbon with plain needle and thread and gathered the bottom together as tightly as I could. Used a longer piece for the larger flower and small piece for the smaller one. I secured the flowers with silver shimmery brads and then folded the flowers until I was satisfied with the look. I secured the folds underneath with glue dots. I used small pearls for the flourishes.

Here is the other card, same base, different flower:
Soooo, that's my offerings for this time.
Do you have tips on how to have cards on hand so that I don't have to work in panic mode??????
Leave me a comment and let me know how you do things....

Thanks for visiting,
ttfn
e

Friday, September 10, 2010

Here it is September!!!

I can't believe it's OVER!!!!  It's still nice outside, but we all know that cold days are coming!!! I am refusing to think about it until I have to.

We are in Chicago right now, visiting with Shelly (our older daughter) and got to see Sandy yesterday,(our youngest).  It's always so fun and refreshing to get away from work and the normal routine of things. Gives me a new perspective and makes my world larger. I guard against allowing myself to become a small thinker....that's why I love this scrapbooking/cardmaking world of ours. There's always new stuff to see, to try and to experience. There's so much talent and new creative ideas out there that I could spend days just wandering through blogs...enjoying all the art.

Here is a wall hanging I did for Sarah, the youngest in Shelly's household. The color didn't photograph too well....I am still having trouble getting colors that are bright, clear and are closer to what the original is.

The materials used here are odds and ends of what I had. We accumulate a lot of "stuff" and I love every bit of it. Don't throw anything away....and then scrounge around and find ways of using some of it. But, as you know, it is never ending because we always fall in love with more "stuff".

That's it for today....
Be blessed dear friends,
ttfn
e

Wednesday, August 25, 2010

A card in blue


Hi all you stampers in cyberland. It is Wednesday and it was beautiful today here in Michigan.
I had to work though, so I didn't get to see too much of it.
I needed a sympathy card, so I tried to keep it simple yet attractive. I also love this verse and I wanted to use it here. This verse reminds me that God takes care of my every need and never forgets that I AM HIS!!!
That's what I want to convey to the  family I am sending this to. God holds them in His loving arms and cares about their pain.

The background is Cuttlebug Dotted Swiss. The two  panels are stamped with a wheat stamp in silver ink. Then overstamped with an iris stamp in medium blue. To get that light look, I stamped off on scrap paper, then stamped the panels.  I didn't want the stamping to stand out too much and it shows off a bit more in real life. It's pretty light here in the picture. The silver ink  took on almost a gold look, but when you move the card around, it is definitely silver.

The double circle bottom cut is a Martha Stewart edge punch.
The small butterflies are also Martha Stewart. Bottom layer is the blue of the mats and the top is cut out of scraps from the stamped panels.
Some very small gold bling added too. I can't do a card without some glitz!!!

Challenges entered for this card:

ttfn: e

Saturday, August 21, 2010

I can't believe it's been two weeks!!!!!!!

I am SO SORRY!!!! We've been working on re-doing our bedroom and time just totally got away from me. I am kind of an "in the moment person" and I get totally involved in what I am working on. And right now, decorating the walls in our newly painted bedroom is just fun! fun! fun! I LOVE IT!!! I went shopping today with a friend for all the little decorating stuff that is so fun to buy and I was amazed at how much scrapbooking has become part of the whole decorating scene. There are flourishes, cute phrases, art for walls, words for walls, etc. etc. etc. Everything I looked at, all I could say was "I can DO that!!!!" Of course, the thing is, it would take forever to do it all yourself.


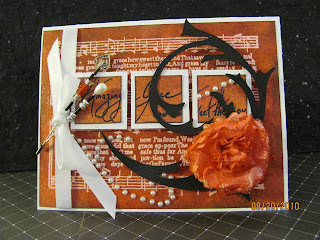
I have a card  that I want to share with you. The background stamp is "Amazing Grace". I just love it!!! I found it at a scrapbooking show in Novi, Michigan (near Detroit). I went there with a friend. Didn't have a whole lot of money to spend so I was being very careful with my purchases. But, when I saw this stamp, I just had to have it. I'm sure I will use it a lot!!!

I made this for Gina K Tuesday Sketch Challenge. I had already started this card because I love inchies and the next day her challenge came up and it was EXACTLY what I was making!!!  How often does that happen????

Card details: First I stamped the Amazing Grace stamp on white, lightly glittered, shiny, heavy cardstock I had bought for Christmas. I stamped in Versamark and embossed in white.
Then I used Distressed inkpads of spiced marmalade, worn lipstick and fired brick. Just kept working it until I liked it. I also used black to get dark spots so it looked splotchy and made all four sides darker.

The inchies were colored with the same colors, and then I wrote "Amazing Grace...how sweet the sound" in my handwriting. I don't have great handwriting, but I like the look of it being handwritten.
Then I sprayed a pearl mist on them. I make my own mist by following Tim Holtz directions for Perfect Pearls Mist.
So the three inchies have a sparkly finish and stand out from the background.
I blackened the edges of the inchies and matted them in white.
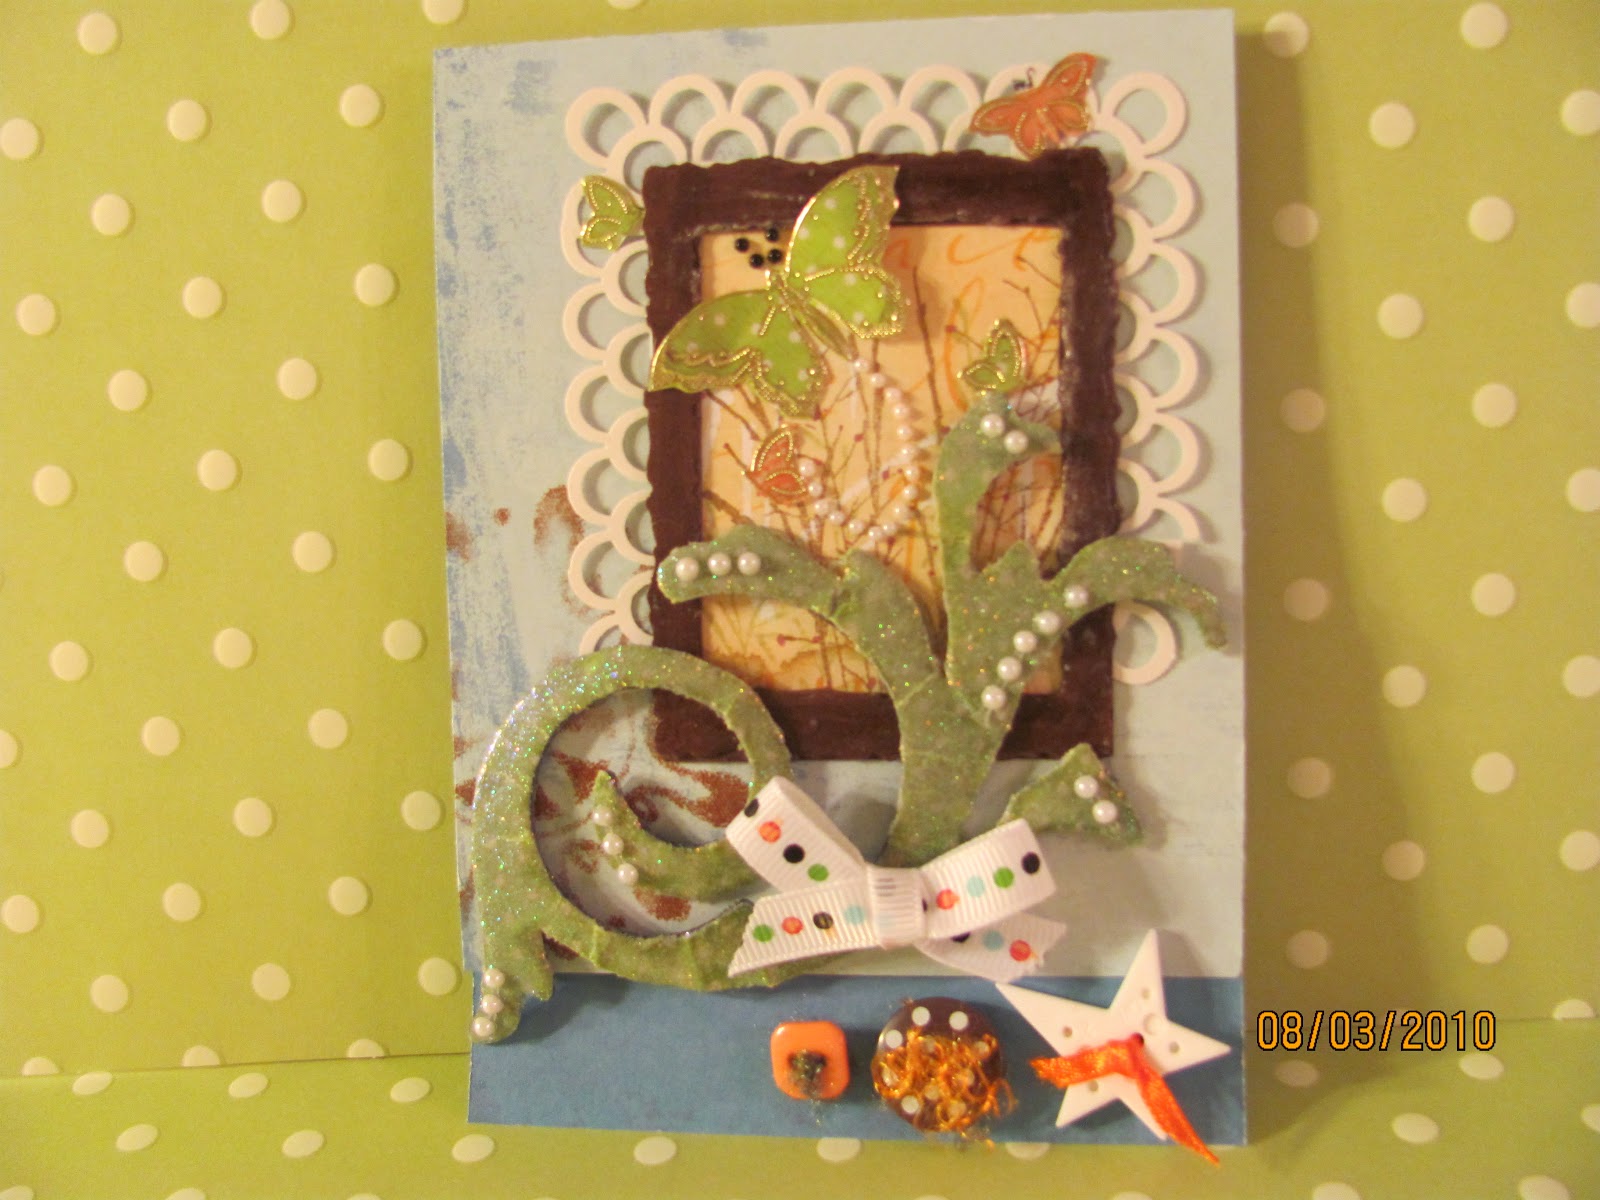
The flourish is a Tim Holtz Sizzix die-cut and the flower is made from coffee filters.
If you would like directions for the coffee filter flowers...please leave me a comment and I can email you back. I love to share techniques.

Thank you so much for looking.
Hope you enjoy....I really like the way this card turned out.
I don't know if pictures ever do a card justice, but I guess we're pretty used to seeing pics and imagining the real thing.

Be blessed,
e

Sunday, August 8, 2010

Gina K Color Challenge

Hello everyone....
Another hot day here...and I am NOT complaining because I love summer...but sometimes a little breather is nice!

I loved this color challenge from Gina K, using red, orange and yellow.  Can you say SUMMER????
But I also had this black and white background that I REALLY wanted to do because I LOVE the paper. Soooooo, I decided to combine. I LOVE the brightness of the flowers and the bird, AND still had that beautiful black and white elegant background.
Hope you like it.

The card: Flowers are from a stamp I have had for a long time. I watercolored them with the beautiful H2O's I bought a couple of years ago. They shimmer and shine so beautifully. Then the bird is a Stampin' Up! punch...with a little glitter of course. I just don't think I can call a card done unless it has some glitter, ribbon, or other glitz on it....

So, there's my entry.
Hope you enjoyed looking.
Have a WONDERFUL & BLESSED week.

ttfn
e

Wednesday, August 4, 2010

A few more challenges

Here's a card I made for a friend in the hospital. It was one of those that kind of evolved. Things just didn't work the way I thought they would, but then in the end it kind of came together. I find it difficult when my plans for a card just don't mesh and I'm left trying to find what would work.

The paper is a favorite piece that I bought several of....but now I have lost my vision for it.
The white punch is Martha  Stewart and the brown frame is Spellbinders. I then wanted an olive green large flourish and covered a Tim Holtz grungeboard flourish with a green polka dot paper. That didn't look good at all so I embossed with clear and then with Kaleidescope. Never did become what I wanted. I added the pearls, that helped.

It's very hard to tell, but the bottom of the card is actually showing the underneath layer. The front of the card is trimmed and the bottom layer is showing in the front. That's where the buttons are. I LOVE the buttons. They really added a special touch. That orange stuff on the brown button is really interesting, I separated some multi colored yarn I have and used just the orange fluffy part...FUN!!!  I don't seem to use buttons too often, but I really like to see them on cards and enjoy them when I remember that I have a nice stash.

Challenges:  Just for Fun: orange (polka dot ribbon and butterflies) olive (flourish) & brown
                     (stamp on card front and frame
                   EBTKS: Buttons

Thank you for looking,
Be blessed,
e

Tuesday, August 3, 2010

Black and white elegant....

Hi everybody, it's Tuesday,  and the challenge at Play Date Cafe is due tonight. It's black and white with green. The dragonfly and the glitz really is green...I just couldn't get it any better than this.

The card is three layers of black and white print. All layers are matted with black. It looks very three dimensional and doesn't seem to need any other embellishments. I tend to like a lot of embellies, but sometimes the print is just too busy and too much...so I chose to leave it alone and leave it very simple.

I made the dragonfly by painting a transparency with alcohol inks then laying a Dazzle on the spot I wanted. Then, just cut out. I purchase my Dazzles from Paper Wishes and I love them. They are inexpensive and one sheet lasts a long time.

Last weekend was very frustrating. I didn't get a whole lot done on my scrapping and I was just kind of spinning my wheels. I had so much to do around the house and everything took twice as long as I hoped it would.
I still have a couple more cards I need to get ready for some challenges I want to enter. So hopefully, the week will go better than the weekend did.
I LOVE CHALLENGES!!! They really get my ideas rolling.

Enjoy your week.....be sure to love on the people God has given you.
ttfn
e

Sunday, July 25, 2010

A Summery Birthday Card

Good Sunday morning...looks like it's going to be a beautiful day after all the rain we have had. I woke up early and have a little time to blog this morning before we leave for church. Found a couple of challenges that fit this card I made. I like the way it turned out...it looks pretty to me, like the niece I made it for.

OOOOOPS I am so SORRY!!! I cannot get this to come in straight....no matter what I do, it still loads sideways!!!  UGH!!!

Anyway, the background paper is a beautiful light purple polka dot that I had hoarded until the perfect card came along. The lacy white under the purple strip is a Fiskars edge punch that I have had for a long time.
Then an assortment of flowers and a huge brad heart from Paper Wishes. They sell these in red, white and pink and I just love them.

Again, sorry about the sideways picture....this is the first time I could not fix it....hope you understand.

Oops, almost forgot, the challenges I am  entering are CARDVAARKS (a Birthday card to commemorate "My Favorite Things Stamps'" Birthday celebration) and CRAFTY CALENDAR (a summer card). I thought this card fit both of these nicely.

Have a WONDERFUL week,
ttfn
e

Thursday, July 22, 2010

A couple of vintage cards

I have a couple of cards for you. I have been madly dashing around trying to get caught up with Birthday cards and other obligations that I almost missed during the time my family was visiting.  It is sooooo much fun playing with grandkids and taking time out from the usual stuff....but then you  have to race like crazy getting back on track....I'm not complaining....just saying :o)

Here's my first one. I love the image cut from Graphics 45 paper. There are several different images on each 12x12 paper and can be cut up and used in many different ways.  Great bargain!
The background paper is a vellum print by Anna Griffin.
To embellish, I used lace and a deep burgundy ribbon.  The lace flower is leftover lace I have had since my daughter's wedding, 18 years ago. The flourishes are Tim Holtz grungeboard.

Ok, here's the second one. The image of the girl on the clock is another Graphics 45 paper. These are all the same image on the page, except for being different sizes. I chose the largest one for this card. In going through my stash of papers I found this map paper and KNEW that the orange flowers would be perfect....that background just fit together so well....I LOVED the color combination. This year my favorite seems to be ORANGE!!!! I wouldn't paint my rooms orange but patches of orange for effect just constantly catch my eye.
Next, finding this strip of chipboard stamps that had been in my stash for ages was the perfect touch for this traveling theme.
The flourishes are Quik-Kutz embossed first with clear and then with Kaleidescope embossing powders. I love this technique because it gives great depth to the embellishment AND the kaleidescope leaves a multi colored glittery top that changes colors and shimmers as the card is moved.
The flower is made from coffee filters. If you would like directions, please email me and I'll be glad to write you back.

Soooo, thanks for visiting.
Hope you enjoy,
ttfn
e

Thursday, July 15, 2010

A fun, crafty day with the grandkids...

Hi everybody,
WOW it's been about two weeks since I've gotten on my blog....
Our daughter and her family are visiting us from Chicago and I get so involved in doing things with them and keeping the kids entertained that making cards has taken a back seat (not in my mind, just in my time on the computer). Anyway, we are having a great time and even spent one whole day crafting.

We found a project...making tiles...then went to the store, bought some Sculpey clay, a HUGE pack of shells made for craft projects, beads, etc. AND frames to cover with the tiles. The next day was actual craft day...rolled out and cut the clay into tile shapes...kids are very inventive and we had shapes of all sizes and shapes (very few square ones for this crew!!!)  We used stamps to get images on the tiles (worked really great!) Dried them in the oven, then colored images and tiles to our hearts' content. We attached beads, glitter, wire...all sorts of stuff that is in abundance in any scrapping area. The problem is, EVERYTHING gets pulled out and the putting back isn't nearly as fun as the pulling out (sigh).
This is the youngest...Eli, he is 5...he was very particular about his tiles. Only used a few colors and he wouldn't allow us to cover the words (which is actually where he was supposed to put the tiles so that he would have a frame around his "Picture"....BUT this is how he saw his project and was very pleased with it!!!
This is Kassidy...She is 10 yrs old. Again, knew exactly what she wanted. Didn't want the tiles together. Made her own "Jesus" picture for the center...looked great! She also made a necklace for herself and a bracelet for her new teacher when school starts....get on the good side of the teacher right from the get-go. No, really, I think it's wonderful that she even thought of her teacher in the middle of summer vacation.


And here's their oldest....Kirstin, she's 14....lovely job. We found this friend frame that she really liked and then decorated it to make it her own...I love the detail and the "organized" look.

Most of all....it was a GREAT TIME together...Fun for a granny to watch the new generation show off their personalities and do "their" thing!!!!

So, that's it for now. We'll be alone again next week so I will be posting cards and things will be back to normal....BUT I WILL MISS HAVING A HOUSE FULL OF FUN, LAUGHTER, FIGHTING, and being a FAMILY!!!! Family is God's gift to us....and I am very thankful for mine.

ttfn
e


Tuesday, June 29, 2010

For the love of butterflies.....

I love butterflies...somehow they are so graceful and gorgeous to look at. They whisper of summer, soft breezes and a quiet, joyful time. You can tell, I'm mesmerized even as I just think about it.

I don't often buy ready-made embellishments...preferring to make my own. But when I saw a pack of these beauties in the store a few months ago, I went for it. I've been hoarding them too, wanting to use them on just the perfect card. Well this is it!!! The colors went together so well and the bottom layer is just gorgeous going from pink to brown to green to blue.  It's one of the favorite embellishments I have ever owned.

Now that I have oohd and aaahd over a store bought butterfly, let me tell you about the rest of the card. The background paper is sort of a vintage paisley that looks like  it's been washed.  The flourishes are sizzix cut with the Cuttlebug and then embossed with a very shiny clear and then clear glitter. This double embossing leaves the flourishes looking very thick, shiny and multi-colored. The sparkle goes from brown to blue and green. And, I have a corner embellishment topped with Stickles on the right.

This card will fit into the Play Date Cafe challenge for scarlet, orange, brown and blue. The top layer of the butterfly has orange on it.
It will also fit for the Crafty Calendar challenge for having bugs on your card. A butterfly is a bug, right?

Thanks for stopping by.
Please come again, and leave me a comment....I love to hear what you have to say.

ttfn
e

Sunday, June 27, 2010

JFF & Speedy the Cat and Cuttlebug Challenges

Here's my card:
And this is the inside and the matching envelope.
The card is an "Inchies" card...one of my favorite layouts that I like to go back to. They're fun and there's so many ways of doing them. Hero Arts featured the "Inchies" stamping technique a year or two ago and I got hooked. So I was really tickled to see that Cuttlebug featured the inchies as their focus on their challenge this week.

The card: Just for Fun Color Challenge was for green, pink and white. So I stuck with those colors in different shades. The white cut mat is a Fiskars edge punch...could not line up the corners no matter what I did, but at least I was able to get them even so that it looks like I meant for it to look like that. I need some new edge punches!!! The white flourishes are a Sizzix die cut, using my Cuttlebug...I love that thing....could not work without it! There is a little heart charm on the right side. It is much prettier for real. It did not photograph well.

Again, the Speedy Cat Challenge: (stampinwithmarkiesmom.blogspot.com) is for 3 flowers on your card.
All four of the inchies have flowers on them. I stamped them and then used the Sakura Stardust glitter pens. Those are my absolute favorite pens. I can hardly make a card without using them somewhere!!!!

That's it for today....
Have a WONDERFUL week.
ttfn
e

Caardvarks & Speedy Cat Challenge

Hello everyone....
I have a couple cards for you that I made to coordinate with the "Caardvarks.blogspot.com" and the "Stampinwithmarkiesmom.blogspot.com challenges for this week.
I am always in need of Birthday cards and it's fun to combine those with a challenge. It gives me inspiration and sometimes techniques that maybe I wouldn't think of on my own. I LOVE to try new stuff and hardly ever make the same card twice...although, if there is a layout that I particularly like, I'll use it again, but change things around.

For this card, I used a mustardy yellow Hero Arts stamp for the background. I used the 2nd generation technique so as not to get a clear image...just color.
Next I stamped the flower heads using two different SU colors of blue. I then embossed the flowers with clear glitter. I cut out a double of the flower images and covered the flowers so that the grass stamp would not go through the flowers, but they would remain on top. I HATE doing that....it's so time consuming!!!
Anyway, next I stamped the blades of grass in a moss green.
The butterflies are gold Dazzles over matching blue CS.

Hero Arts background: Misty Swirl
Flowers: Stampin' Up  (don't know the set name)
Blades of Grass: Stampin' Up

So there you have it...it was fun. I really like the colors. Seems summery, and I really, really, REALLY like summer!!!

ttfn
e

Thursday, June 24, 2010

A card for my Pastor

I found this card layout on Lynn Mercurio's blog "Stamperosity.com" . I needed a masculine card for my Pastor's Birthday and loved this layout. Thank you, Lynn!

The card background is from a pack I had and the blue leafy stuff is embossed with a slight glittery sheen.
Just enough to add a little sparkle, but pretty subtle.
The letters are chipboard that I colored and embossed to go with the whole background theme.
The red ribbon is a very light see-through type that looked really good. Satin would have been very nice also, but I didn't have the right red.
The navy blue matting just pulls all those colors together.

This will definitely be one of my go-to card layouts.

Be back soon,
ttfn

Wednesday, June 16, 2010

Some More Great Challenges

Hi everybody....
Lately I have become quite engrossed in all the challenge blogs that have sprung up all over. You can find a challenge for just about any kind of an inspiration you like.

This card fit in nicely with the Just For Fun Color Challenge. The colors were tan, light blue &olive; and that's exactly what I had made for a volunteer in our church library.
Stampin' Sisters in Christ Challenge was for a male card and I think this works. I think the colors and the bird work well for a man.
The third challenge is for the Stamptacular Sunday challenge. Theirs was a male card also that could be used for Father's Day.

The bird on this card is cut from a punch by Stampin' Up...I love that punch. It is the perfect size and looks great layered or embossed. I use it a LOT!!!
My other favorite thing on this card is the "You make me smile" stamp. I LOVE that statement...
Unfortunately, my stamp is almost ruined...it didn't last very well and I have been searching for a new one something like that. I have not come across one yet. If any of you know where I can buy a "You make me smile" stamp, let know. I just cannot be without one!!!

Thanks for looking,
ttfn
e

Thursday, June 10, 2010

Anniversary Card for Stamptacular Sunday Challenge Blog

Hello Peeps,
I found this challenge blog that I had not seen before. Their theme this week was a wedding or anniversary card and it was perfect for this verse I had found. So I went for it. If you like challenges, take a look at their blog. It looks like it will be fun.

A black and white card seemed to be the right thing for this verse . I'm an old romantic when it comes to poetry and beautiful words that touch the heart. I gave this card to my daughter as a "just because" card because I felt that it spoke of the relationship they have in their marriage.

On to the details: the white cardstock is a swiss dot embossed with the Cuttlebug. The flower oval is done in the black magic technique...which is to stamp the image on black cardstock in white ink. Color the image with watercolor pencils, then outline the edges with a white gel pen. It is a very striking. The colored image looks good, but when you add the white outline, the whole thing just pops! I LOVE the technique.

The butterfly is a Martha Stewart punch. I punch out a bunch of them in different colors and then emboss with several layers of clear, some with sparkles, some without. Then I have some on hand whenever I need. Embossing them in clear gives them this iridescent multi colored and thick/rich texture. It's hard to see it here, but this butterfly shows a lot of iridescent purple shine.

Hope you like the card as much as I enjoyed making it. Leave me a comment to let me know you've been here. I'm new at this blogging stuff and I LOVE to get comments!!!

Be back soon,
e

Wednesday, June 9, 2010

Crazy 4 Challenges & Charisma Cardz

Hey everybody,
This card was made specifically for the two challenges I am entering this in. I am having a hard time getting the link to be linked to the card properly. I am sure it's easy once you've done it correctly once or twice, but as yet I have not been successful....Hopefully, this one will work.

I love this card because it has a clear overlay on it. It's not what I do very often, but I really like it. The transparency is stamped in white Staz-On and then the tiny flowers are embellished with diamond Stickles. I know you can't see that here, but it's just enough glitz to be very pretty. This top layer is adhered to the card underneath the ribbon so that the glue dots are hidden.

The underneath black die-cut has flowers done in the black magic technique. They are stamped in white, colored with watercolor pencils and then outlined with a white gel pen. This is a new technique to me and I LOVE it.

And then the ribbon...I used black satin as the first layer and then pleated the polka dot ribbon on top.

Thanks for stopping by and taking a look. Hope you like it.
I'm off to work today and want to get this posted before I leave.
Come back soon.
ttfn,
e

Sunday, June 6, 2010

InLinkz Challenge #1

Here is my boy card for the challenge. It's a tent card so that the cut out circle can dangle easily. My grandson, Eli, is 5 years old and they just got a new puppy...I thought this little rub-on was perfect. I wasn't sure about the colors in the challenge when I first started but they worked really well together and that's the fun part of participating in challenges is that you use colors or designs that maybe you wouldn't normally try.
VERY FUN!!!
By the way, the little poem on the front is the old adage that says, "Snips and snails and puppy dog tails,
that's what little boys are made of..."

Saturday, June 5, 2010

Wow!!! Where has the time gone?

I did not realize that I have not posted since the end of April...That doesn't mean I have not made cards...I just have not been able to get them onto the site.And even now, the card that I want to put here just will not cooperate. But I'll keep trying. I'm going to have to find some classes about how to take good pictures of my projects and size them so that they will be accepted by Blogger.

On to the card above:
I love black and white and this color. I also love very simple, elegant designs. BUT I hardly ever make cards that are like this because it always seems like I should be adding "stuff". I don't know if you can tell from the pic...but this card shows really nice in real life. The very soft pink glittery part is just enough to give it wonderful flair. I made this card for a friend whose husband died just a couple of days ago...No card can erase the pain she is going through...only God can heal such an ache. I pray that for her.

Thank you so much for looking,
e


Friday, April 30, 2010

It's a Challenge Friday

Hi Everybody...It is Friday...beginning of a beautiful weekend. I hurried up to make this card for a couple of challenges that I like: Caardvarks is a monochromatic card. This fits the bill nicely, since it is a very orange background with deep burgundy embellies. Sisters in Christ and Our Daily Bread both were for a Mother's Day Card. My Mom is gone now but I thought this "With all my heart" would work perfectly for someone who is very special to me. I am trying really hard to get my pictures to show the true colors...I don't know if any of you have that problem...but the colors are really difficult to get right. That ribbon is not pink. It is dark burgundy...however, it is shiny and see through and it just would not come out right...

I love the background on this. It is done with alcohol inks on glossy cardstock. We did several of these in different colors in my card workshop so that everyone could try their hand at alcohol inks to see how they liked them. It was really a lot of fun. Messy (smile) but fun. It was interesting too, how different each person's looked. Directions are the same, but everyone has a different way of doing it and it was really surprising. This one turned out a beautiful orange with lots of darker reds (and a little green) too.

The scalloped off-white square was cut with my Cricut and embellished w/a little bling. The off-white square in the middle is matted in the burgundy and then the corners are cut with the ticket corner punch (I love that punch). The heart is metal with black brads. And the ribbon is a bow tied and then pierced with a pin. I added beads to the pin to dress it up.

So there you are.
Thanks for coming by and looking.
I'll be back soon.
e

Monday, April 26, 2010

Howdy everyone,
It is such a beautiful day today here in Michigan. Our windows are open so that we can enjoy the fresh air and the warm breeze. This is, by far, my favorite time of the year. God knew how to revive us after a long winter....

Today's card is one of those "accidental favorites" that happen once in a while. I had a background paper that I downloaded from a Heidi Swapp freebie. I LOVE the paper but wasn't quite sure what to do with it. It's off white with swipes of pink/reddish color and then silver swirls. I wanted the paper to be visible and that's quite hard with a card, because most of it gets covered up.I thought about the Dazzles that I like very much and decided to be quite simple. I stacked the Dazzles on a pinkish red vellum and then stamped my quote. Added three tiny hearts that come in the Dazzles package and they fit in really well with the silver flourishes. Then to give the card a little interest, I crimped a stamped and embossed shiny dark blue cardstock and put buttons and hearts where the two papers meet.

I really like the result. Simple, but it looks good and is pretty flat for mailing (sometimes mailing makes a huge impact on what kind of a card can be made).

I think that will be it for today.
Enjoy your week...hope the weather is beautiful wherever you are.

ttfn
e

Wednesday, April 21, 2010

Making your own flowers

Hi all you peeps in cyber space.
Another lovely day in Michigan...cool though. I like it warmer, but the sun is shining and that makes it all good!
Here is a card that is a lot prettier in real life than the picture. The angle on this card is just not right and I didn't see it until now. And, of course, the card is already given away. Soooo, sorry about the pic.

I have been working on making my own flowers. They are very expensive to buy and I love to be able to make my own embellishments. It's just fun. My "thing" I guess....Anyway, I am finding quite a few tutorials by some of my favorite crafters and I have tried them all. Much variety. I love it!!! And am thankful that people share what they have learned and the cycle continues. What a wonderful community of people, sharing their love of art with whoever is interested enough to look. If you would like details on how to make this flower, please comment on this post and leave me your email address. I'll be glad to share.

So, here's the details on this card: light colors on the card with a deep burgundy flower.The colors really worked together. The flowers in the background picture are a cut out from a sheet of Anna Griffin vellum pack. The leaves are cut by my Cricut Storybook cartridge. I like to spritz my leaves with a little gold spray that I make from Pearl-Ex or Perfect Pearls. It makes them look dusty and not so "green". There's a few burgundy flourishes cut with the Cuttlebug and a ribbon that I colored to match my pink color scheme. I want to tell you about that heart embellishment. I love it, it's from Paper Wishes. They have good stuff and I love their Webisodes.

Hope you enjoy this week.
I've got a busy weekend coming up...and that's good. I hate being bored!!!
Blessings,
e

Friday, April 16, 2010

Another vintage card...

Hi everybody,
This is another vintage image from the Crafty Secrets Post Card collection. What fun to work with. I really like them a lot. I am a card maker and a scrapbooker, so I tend to like a large variety of looks, patterns and styles. I like from the simple and elegant to Tim Holtz' layers and layers of color and embellishments. It's the MOOD that makes it happen. Please leave a comment and share with me what type of style you tend to go with...

Now to the details of the card: The flower, lace and brad are just leftovers from other projects. The flourishes is one of my most used QuicKutz die cut that I use with my Cuttlebug. They seem to be just the right size to fit on a card. The butterfly is the Martha Stewart punch. I just got that and I absolutely love it. It is beautiful.
I added some gems and black Rain Dots from Fiskars. Those Rain Dots are of varied sizes and I use them everywhere!!! Then lastly, that beautiful F - Friends is a stamp from Stampin' Up! OMG one more thing I just acquired and can't wait to use it everywhere!!! I wish there were more letters made like that with words attached. It is so stunning!. I stamped the letter and word (they are attached) onto cardstock then cut the front of the letter out, tearing the back part just past the word. Added some gems and it's good to go!

Enjoy your weekend. Hope it's beautiful where you are. More than that, hope it's beautiful around you, no matter where you are!
Blessings, ttfn!

Monday, April 12, 2010

 Hi Everybody...

It's Monday morning, the sun is shining and the sky is blue. It feels so GOOD to feel that spring air here in Michigan...winters always seem so long here and you can really tell...people just can't wait to get into their sandals. YES!!!

I bought a couple of packs of Crafty Secrets Vintage Post Card kits. I fell in love with the images of old fashioned girls, baskets, birds and flowers. Just couldn't wait to get some here so I could play. I didn't actually make post cards to send, but mounted the images on the chipboard that comes in the kit and adhered it to my cards. Then I embellished to my heart's content...it was so FUN!!! I really love these. If you like vintage cards, take a look at these on the Crafty Secrets site.

I also saw a video tutorial on Paper Wishes and they used the images for cards and layouts. Great webisodes on the Paper Wishes site. Check them out if you haven't already.

The butterfly on this card is the Martha Stewart punch...I always layer two cuts...somehow they look better.  I rubbed some Distress Stickles on the top one to give it some glitz...that great little bird is a Stampin' Up punch...so cute. I saw where Tim Holtz teamed up with Sizzix and has a bird too. They are such a cute addition to these kind of cards.

I'll have another vintage card for you mid-week.
Until then....ttfn
e

Saturday, April 10, 2010


Hello Everyone....
It's Saturday morning...a beautiful sunny start to a new day. It's been a little cool the last few days, but March had been very beautiful and I am sure April will warm up too. I  L.O.V.E. spring. Everything is fresh and the different greens on all the budding trees just makes me want to stay outside and drink in all the beauty I can.

The card I have for you today was made for my husband. For the background I used a page from an old dictionary I have that I have been tearing up to use for appropriate words on a card. I love the way it turns out. The word on this one, of course, is "husband". I stamped a blue SU! flourish to give it interest. And used silver glitter letters and a heart with some small rosebuds. the cut out background there is a Cricut cut from the Storybook cartridge. That cartridge has so many elements on it that can be used on cards...I just love it and use it all the time.

The bottom navy blue and silver piece is a piece of blue cardstock I embossed flowers on in silver and crimped it to look like cardboard. Then of course, the buttons. I love the buttons.

My goal in this blog is to show a lot of self-made embellishments. I love making my own embellishments because of the color combinations and also for cost. It's really fun to play around with different cuts and colors until I am pleased with the result.

TTFN (ta-ta for now!!)
e